Who is this guide for?
This definitive guide to retail merchandising is for multi-unit retailers in industries such as pharmacies, spas, clinics, telecommunications, furniture, thrift, and quick-service/fast-casual restaurants. This guide also helps manufacturers or distributors of consumer packaged goods.
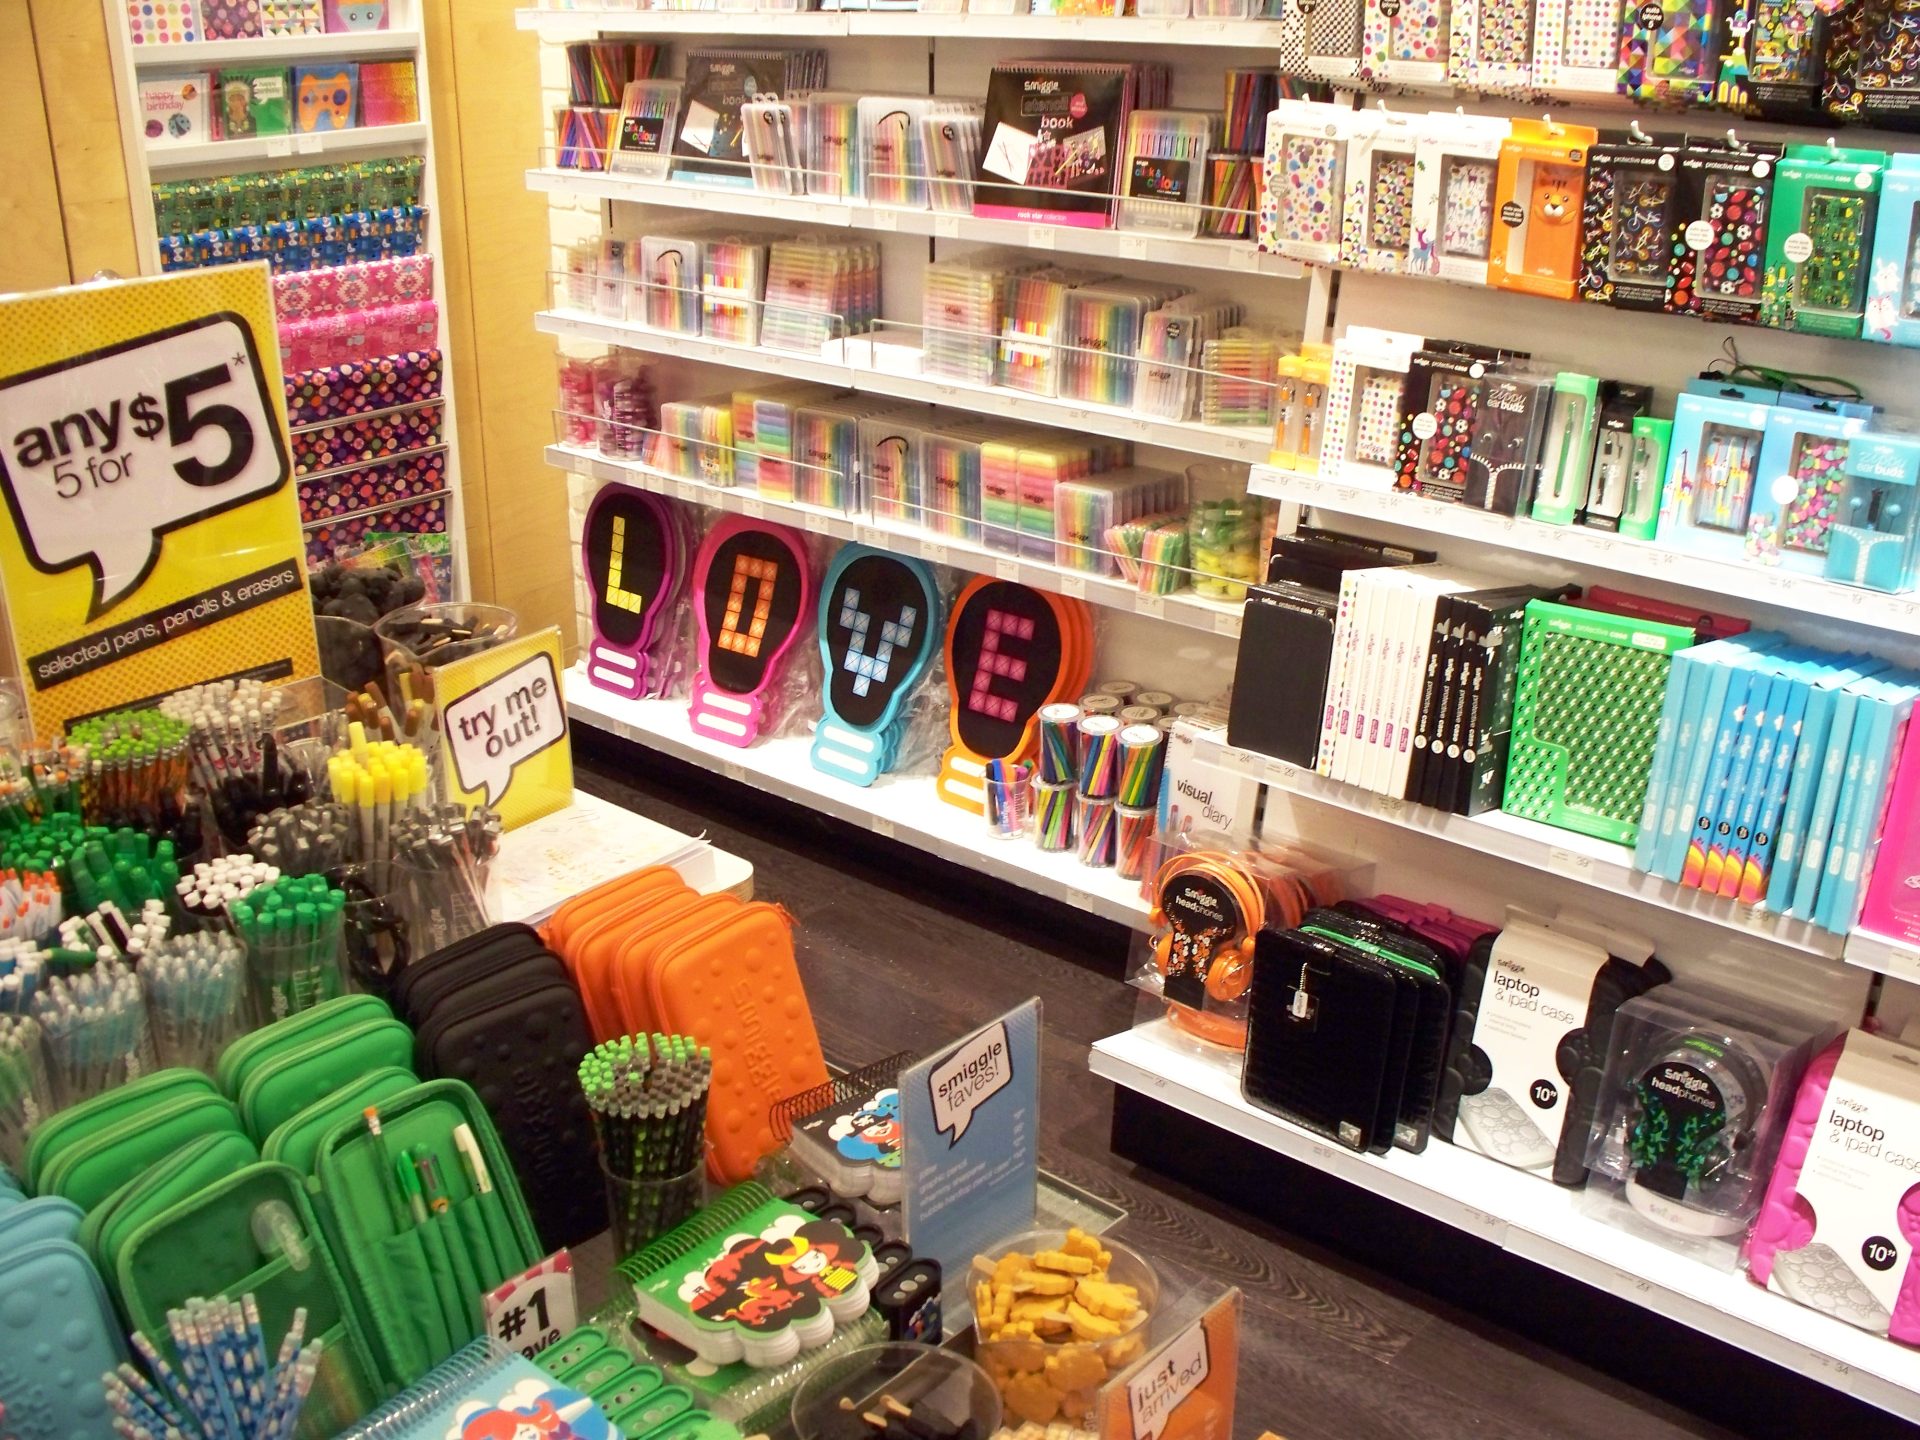
In retail, “merchandising” applies to a broad scope of organizational activities: product design, display design, product stocking, store design, packaging, pricing and deciding what products should be presented to which customers during a particular season. All these activities come together to drive sales in-store and generate revenue.
If your merchandising program needs a refresh, or you need to execute or validate merchandising in stores/geographic locations, this definitive guide to retail merchandising is for you!
Contents
| The Importance of Merchandising Execution |
| How to Improve In-Store Merchandising Execution |
| – Formulate and distribute a retail merchandising plan |
| – Create a merchandising audit program |
| How to Build a Merchandising Audit Checklist |
| What to Include on a Merchandising Audit Checklist |
| – Store exterior and entrance |
| – Exterior windows |
| – Exterior signage |
| – Store Interior |
| – Sales floor layout and aisles |
| – Interior signage |
| – Displays/shelving |
| – POS |
| – Lighting |
| – Staff |
| Execute the Merchandising Audit Program |
| Seasonal Merchandising |
| Merchandising for Social Shares |
| Common Merchandising Mistakes |
| What to do about Unsuccessful Merchandising Campaigns |
| Merchandising: Sample Checklists |
The Importance of Merchandising Execution
Merchandising is a key revenue driver which is why organizations allot 13.6% of their total budgets for marketing and merchandising. When done well, merchandising is worth the investment.
Solid merchandising execution can raise same store sales by 3.7%. Still, in-store merchandising execution remains a pain point for retailers of all size.
A study found that compliance rate of displays was expected to be upwards of 70% but in reality, compliance was only 40%.

How to Improve In-Store Merchandising Execution
Success in retail boils down to execution. Execution improves when a retailer puts in place a clearly communicated merchandising plan and then measures the results.
“The retailer that formulates a compliance plan, enables it with appropriate solutions, and measures its outcome relentlessly will always achieve better performance on in-store programs.” – James Tenser, Principal VSN Strategies
Formulate and distribute a retail merchandising plan
A solid plan helps you define the merchandising project, its scope, set goals and stay focused. Retail training expert Bob Phillips recommends including the following in any merchandising plan:
- The overall plan of how traffic moves through the store
- Department turnover plan for seasonal campaigns
- Budgets for props, lighting, signage, and fixtures
- Merchandising planning system to help maximize turn and minimize markdowns
- Predictive analytics to determine the variety of merchandising available to customers
Distribute planograms to clearly communicate where and how products should be displayed. Ensure there is adequate time to ship product and display props. Analyze traffic flow and place displays where they will achieve maximum impact. Be aware of dead spots so that you can correct underserving areas. Last, ensure stores have a way to contact and follow-up to ask questions and report any issues.
Once your plan is in place ensure stores are aware. Remember, poor communication results in poor execution. Lack of communication is the root cause of 20% of retail program failures.
Use the Right Tools
Too many communication tools can cause confusion; your employees need to know where to go for essential merchandising resource files, planograms, tasks, and feedback. While your processes should still include email and phone communication, your communication should not be limited by them. Streamline your communication process.
Make a list of communication essentials, e.g. a content management system to eliminate physical paperwork and store planograms and merchandising best practice photos, task management software to assign and track promotion completion, instant messaging for quick communication, dashboard merchandising KPIs to get everyone on the same page and focused on the same goals. There are numerous out-of-the-box software solutions made for retailer communication and collaboration (most with a free trial).
Once stores are aware of your merchandising plans, the best way to ensure compliance is to institute a merchandising audit program. Conducting regular merchandising audits helps uphold company standards, improves operations and drive sales.
Create a merchandising audit program
Merchandising audits, also called Store Walks or Store Visits, drive higher compliance with brand standards at store level. They increase sales and profit margins, boost customer satisfaction and cut business risks. Audits are a way to inspect what you expect.
At the core of any successful audit program is a checklist covering key compliance areas. Below we detail best practices to consider for building a merchandising audit checklist and executing a merchandising audit program.
How to Build a Merchandising Audit Checklist
You can use a number of available programs, like Excel, to compose your merchandising checklist. However, a smart checklist can save ample time on preparation, follow-up, and the actual store walk, as well as help eliminate administrative errors.
Smart checklists are based on a form and can have points, best-practice pictures, attachments, conditional items, critical items, and action plan recommendations. Smart checklists allow merchandising standards to be checked, deficiencies tracked, assigned and resolved. Here are 10 steps for building a Merchandising Audit Checklist:

1. Think about the checklist’s metadata
Metadata is data about the store visit. Customers who use Excel-based forms typically expect user-entered fields such as store number, completed by, date, etc…
Metadata is largely automated/pre-populated with retail audit software. The auditor’s information is derived from the login, the store pick-list is built specifically for each user and based on the user’s current GPS location and the date selected.
2. Group items into sections and sort sections according to the visit’s natural flow
Whenever possible, sections should be laid out to match the natural flow of a visit (a merchandiser physically walking the store). Start with the exterior (outside signage and windows if applicable) and work your way in, around the aisles and into the back of the store. While you can jump around between sections during or after the visit, setting up the form according to the natural flow of a visit saves time and is more intuitive.
3. Think about “non-applicable” sections/items
Certain sections or items (questions) may not be applicable to all locations. For example, the “Floor displays” section may not apply to a small store format located in an urban center. Likewise, certain promotional signage may not apply to all retail banners in a merchandiser’s territory.
Retail audit software allows you to disable entire sections and items at certain stores according to the store type or banner. Doing this saves time and again, is more intuitive. It also means that head office can build one checklist for all locations.
For paper-based checklists, you may want to provide an NA option with a section for comments to get the most complete information.
4. Ensure adequate coverage
While the individual situation will vary, you should address some or all of the following areas, each represented as a section (for further details, see below or refer to our merchandising checklist):
- Store exterior and signage
- Store layout and sales floor: aisles, product, displays, hotspots, fixtures, the point of sale counters and gondolas
- Shelves: stocked, planograms, pricing, signage
- In-store promotions: signage, displays, bins
- Staff: training, customer service, product knowledge
5. Avoid large sections
Instead of creating a small number of large sections, consider creating a larger number of small sections. This helps with data-entry on smartphones and also renders the reporting more granular and meaningful.
For paper-based checklists, this allows you to flip easily between pages to access the relevant section and add up your final scores.
6. Assign points according to importance
While it is easy to think of everything as important, some items are often more important than others, even critical to the continued success of the business. Seasonal merchandising and CPG-paid bulk floor displays come to mind.
Assign points and, if you are using software, make use of a “Critical” flag accordingly. A “Critical” item sets the value of the entire section to zero, regardless of other items, if found non-compliant during the visit. With software, you don’t need to worry about keeping track of the total score. Scores are automatically calculated including the visit score and a score by section as the visit takes place.
You may also want to assign tags to items within your checklist. Examples of tags may be “customer service” or “cleanliness.” At the end of the visit, you will also receive individual scores for these tags to help you identify other areas that might need improvement.

7. Be specific, descriptive and visual
Merchandising standards should be clear and unequivocal. Avoid vague words like “recent” or “good.” For example, instead of saying, “Product ordered recently,” consider using, “Product ordered less than 2 calendar days ago.” If referring to the number of product facings or lapsed times, give actual numbers.
Clearly spell out what the standard is. If it takes one paragraph to define the standard, use one paragraph. Attach a best practice photo to an item to illustrate the standard; 40% of people respond better to visual information, and visual information can increase understanding by up to 200%! Including best practice illustrations in your merchandising audit is one of the best ways to drive your standards.
8. Think about audit frequency
The frequency of merchandiser store visits (at least visits involving the merchandising checklist) will vary from one organization to the next. On one end of the spectrum, some organizations conduct as many as one visit per week. Other organizations may only conduct one visit per quarter. Some organizations use a hybrid model. They use a standard form to capture their core merchandising standards (say twice a year) and create a number of smaller forms for visits throughout the year, sometimes tying these visits to seasonal programs.
Retail audit software allows an organization to create any number of checklists, which means stores can also self-audit. Mandatory photo capture and visit attachments can ensure head office has a real-time window into store merchandising initiatives without the need to travel.
9. Field test the checklist
Start with a small group of users and stores. The idea is to get feedback early and often before you deploy across all locations.
Remember to keep your KPIs and goals in mind. Are the items on the checklist relevant to the standards you need to inspect and the execution you need to measure? Does the checklist organization make sense with the flow of your stores? Is the wording clear? Will the wording provide clear and granular results?
A form may look fine at head office but prove to have severe shortcomings when you actually conduct a merchandising audit. Run a small pilot and adjust as needed.

10. Review with the team and adjust
Discuss the checklist and pilot with your merchandisers, field and sales managers. Solicit their input and feedback. We call this phase “calibration“.
A merchandising checklist is as much an audit tool as it is a vehicle for continuous improvement. Define the standard, communicate and measure it. Then, you will meet the standard and achieve your sales goals.
A word about general presentation…
As with any specific departmental audit program (merchandising, loss prevention, health, and safety), general operational factors such as cleanliness, orderliness and safety should be in view. While your district managers, sales reps or other resources are in the store, have them conduct one or more audits on broad operational factors such as general cleanliness or safety and security. It does not have to take a lot of time and paints a more complete picture that gives some context to your merchandising program.
The best merchandising program, even if implemented in time and in full, will be completely ineffective if shoppers won’t set foot in the store or if the general presentation of the store is not conducive to positive customer experience.
What to Include on a Merchandising Audit
In retail, merchandising is a category with a broad scope. According to retail expert Francesca Nicaso, “Everything that customers perceive when they walk into your store falls under the category of retail merchandising.” This includes all the sights, sounds, smells, and tactile experiences a customer encounters in your store: window displays, lighting, store layout, signage, product display, POS promotions, music, testers, etc.
Keeping merchandising initiatives fresh and well-executed is paramount for organizational success. As noted above, individual stores may differ, but a comprehensive merchandising audit will pay attention to the following areas:
- Store exterior, window displays, and signage
- Store layout and sales floor: aisles, product, displays, hotspots, fixtures, the point of sale counters and gondolas
- Shelves: stocked, planograms, pricing, signage
- In-store promotions: signage, displays, bins
- Staff: training, customer service, product knowledge
Store exterior and entrance
First impressions do make a difference. “One of the most essential measures when it comes to running a brick-and-mortar store is getting foot traffic. The more traffic you generate translates into more opportunities for sales and customer engagement, which in turn leads to the main goal — increased revenues,” says Nichole Leinback Reyhle, Founder of RetailMinded. A survey found that 95% of shoppers say a store’s exterior appearance influences where they choose to shop.
Customer’s are not interested in a storefront that is dark or dirty. Start off your audit by checking on the store exterior and surrounding area.
- Store name is clear, visible and well-lit. If applicable, the address sign or numbers are easily visible from the street or passing vehicles.
- Ensure external storefront is clean without debris.
- External storefront is well-lit, including doorways, back lots and sides if applicable.
- Parking is clearly marked, lot is swept and free from debris.
- If landscaping is applicable, is it well maintained. No dead plants, weeds, disorderly mulch or rocks.
- Store designates an employee each shift to maintain exterior cleanliness including windows and signage.
- Entrance, windows and signage are well-lit.
Exterior windows
Window displays are key for creating the emotional impact that makes customers want to enter your store. Keep them clean, well-lit and rotate often to keep attracting valuable foot traffic. As a best practice, showcase the newest and/or high-value products in the window or nearest the inside of the entrance.
- Windows are in good condition and clean. No smudges, weather impact, cracks or chips.
- All windows feature the latest campaign and products.
- Windows are well lit with feature product highlighted and remain so after closing hours.
- All windows conform to merchandising planogram and setup guidelines.
- Window displays are rotated according to the organization’s seasonal calendar and promotional events.
- Display supporting equipment (fixtures, shelving, lighting, mannequins, and props) are in good repair, clean and without visible damage.
Need some inspiration for your window displays?

Exterior signage
Your exterior signage is what helps get customers through your door. “According to one study, 76% of consumers have chosen to enter a store they had never before visited based purely on its sign, and another 68% admit to having made purchases of products or services after a sign caught their eye,” details Leinback Rehyle. Can potential customers tell exactly what you sell from your storefront signage? If not, its time for a redo.
- Signage clearly visible to passing pedestrian and vehicle traffic.
- Exterior signage, including brand name, is well lit with no burnt out fixtures.
- Store hours up to date and visible.
- Window signage decals are in good repair without bubbling or fading.
- Sandwich board is clean, dust-free, and displays up-to-date promotional information.
Store Interior
The layout of your sales floor should support your branding and your product campaigns. Cleanliness and orderliness are paramount. Here are some key areas that deserve your attention:
Sales floor layout and aisles
Ensure customers can move freely through your store or restaurant. Whether you are set up on a grid, loop or free-flow layout, check that display tables do not congest prime browsing areas.
Customers can become uncomfortable when others bump into them or when they bump into other displays while they are browsing. They may even move away from merchandise that interests them just to avoid feeling confined and crowded. Ensure shoppers can move freely between displays and through aisles.
Leaving some room allows customers to slow down and appreciate your offerings, and it makes your space look like it was thoughtfully laid out and curated.
ADA Compliance
Designing your space to comply with the Americans with Disabilities Act (ADA) guidelines is a win-win. According to the ADA National Network, 54 million Americans have a disability. It also can help future-proof the business; by 2030, 71.5 million Baby Boomers will be over 65, bringing additional needs to accommodate age-related conditions. A layout that is physically easy to navigate welcomes caregivers with strollers or mobility equipment into your store.
- Sales floor layout and positioning are compliant with current company planograms and branding standards.
- Aisle ways are free from debris.
- Flooring displays do not block aisles or customer movement. No tripping hazards.
- Displays and aisles are wide enough to accommodate strollers and mobility assists.
Interior signage
Messaging is critical but signage positioning and hierarchy are just as important. Remember, it’s not just what you say, it’s how you say it. With signage, less can be more. Displays with signs get 20% more traction, but signage overload can make your stores look cluttered and inventory appear cheap. Keep signs bold but concise and well-placed to draw the customer’s eye to the product you want to highlight.
For any marketing, Yana Voldman, Strategy and Business Development Manager at UDIZINE, recommends trying “the five-second rule: You should be able to easily read the sign in five seconds or less, absorbing its meaning without any confusion. If your message needs to be longer, consider a series of signs incorporated aesthetically into the overall visual merchandising theme.” Use solid points (5 – 7 words or less) to best describe why a customer can’t do without this featured product.
In addition to signage that is informational, don’t forget to include a call to action (as seen below). This can be as simple as a separate sign that says, “Try me on!”. Signage should evoke an emotional response from the viewer which can help to strengthen sales.
Finally, pay attention to the placement of signs and other supporting materials like props. Feature signage should be placed at eye level – the 3 ½ to 4 1/2-foot point. Props can be grouped in threes but should never outshine the products themselves.
- Correct product and category signage are used and in good condition.
- Signage is current and accurate.
- Shelf wobblers are used effectively and consistently with planograms.
- Signage is utilized effectively, does not overcrowd displays or shelves.
- Seasonal and high-value SKUs have signage to highlight the product.
- Signage calls to action are employed.
Displays/shelving
Displays
Retail thought leaders Kizer & Bender recommends keeping the Decompression Zone (DZ), the first 5’ to 15 feet inside the door clear: “The DZ gives shoppers a chance to transition from the parking lot (or mall) to your store. Shoppers will miss anything you place in the DZ so it needs to be an open, uncluttered space. Place signs, baskets, etc. just outside your DZ where shoppers are more likely to see them,” they explain.
Place displays in strategic hot spot areas such as the end of aisles, the POS, and to the right of the DZ. Look out for damaged displays with broken or missing pieces, burnt out lights, peeling stickers, faded signs or fraying flooring that could become a trip hazard.

Don’t forget to employ “speed bumps.” True to their name, these displays are designed to slow customers down and pay attention to your product. Speed bumps are especially helpful for retailers with long aisles layouts where they break the monotony with a new focal point.
Your categories and subcategories should make sense and support one another. This means grouping like items and colors together in a way that makes sense to your customer but also cross-merchandising to increase your average ticket value. For instance, alcohol retailer BevMo regularly includes accessories and food parings in their alcohol displays.
Shelves
Shelves should be fully stocked but not cluttered. To customers space connotes value. “Nothing lessens your customers’ perception of the value of your products like overly-crowded displays,” says Nicasio. Restocking should be a daily (if not several times per day) priority. Products should be fronted correctly.
When organizing your shelving and products, always consider accessibility for all customers. Last, display equipment and shelving should be in good repair with no dust, chips, cracks or pulling away from the wall if mounted.
- The purpose of displays are clear and can it be understood in 5 seconds or less.
- Quantity and types of gondolas/displays fit the store space.
- Promotions are current and consistent with company directives.
- Displays and shelving in “like new” condition.
- Stand-alone displays maintained and re-stocked daily.
- Impulse hot spots are used strategically (counter, right of the front entrance) for high-margin impulse SKUs.
- Specials bins or baskets clearly signed with pricing.
- Wall displays are utilized effectively.
- Shelves are fully stocked and organized by size/color/brand. Cross-merchandising is appropriate.
- Number of “facings” is appropriate to allow the optimum number of different SKUs without overcrowding.
- There are no product holes.
- Product is easily accessible.
- All products are priced correctly.
Make it a priority that general housekeeping such as vacuuming, dusting, product restock, and cleaning of shelves and floors are done daily if not more often. Even the most creative merchandising displays will lose their appeal if they are cluttered, dusty or understocked.
POS
Checkout counters can take up as little as 1% of store space but have been known to increase sales by up to 20%! The POS is the perfect place for impulse purchases because customers waiting in line are already in the mood to buy. Choose lost cost, handy items that complement your best sellers. Nicasio recommends hitting the following psychological triggers to encourage those impulse purchases: urgency, value and novelty. Consider a “Buy one, get one” or “This week only” promo.
Because these products are ideally small and portable, change them out often to keep them fresh. The POS is a perfect place to execute seasonal marketing because it doesn’t take a lot of inventory to make an impression and play upon shoppers seasonal or holiday feelings. For example, Starbucks utilizes its POS to display add-on, prepackaged treats. It is also where they display their seasonal blends, holiday or local themed merchandise.
The POS area does some heavy sales lifting, and it is also where customers can spend some time waiting in line, all the while evaluating your store. Keep this area neat, well-lit, and debris free. Keep employees’ personal affects (water bottles, keys, wallets, phones, snacks) out of view. Have some small housekeeping tools (hand held vacuum, brush and dustpan, glass spray and dust rags) close by for quick touch ups during slow periods.
- POS is easy to see and identity from any area in the store.
- It is well-lit.
- POS counter is wiped, smug and clutter free.
- Impulse purchases are stocked, dust free and rotated according to seasonal planograms.
- Employee personal items are out of sight.
Lighting
Lighting can make or break your bottom line. Consumers avoid dreary and dark storefronts. “Bad lighting can make even the most exciting inventory look drab and lackluster,” Nicasio observes. She continues, “When you consider that 70 percent of retail purchases aren’t decided until the customer is in the store, it’s easy to see how poorly lit merchandise can have serious negative side effects on your sales numbers.”
The effect of lighting can lead to a 10% sales boost. A good lighting base should consist of a number of grids that can be individually controlled depending on the area of the store as well as the time of day or year.
Once you have a good base, you are ready to start incorporating more layers and techniques. Pay attention to lighting throughout the store walk.
- Lighting positioned for maximum impact.
- All lighting positioned to illuminate dark corners.
- Select store lighting creates a focal point to highlight a specific product.
- Store windows are well-lit with curated lighting.
- Displays and shelves are well-lit.
- There are no burnt-out or missing bulbs.
- Backup bulbs are on hand in the event of burnt out/missing bulbs.
- Safety regulations are in place and distributed so that employees understand how to safely change-out lighting.
Staff
Planograms, merchandising guild lines and task management software all aid solid merchandising execution, but your employees remain key to implementing your merchandising campaigns and vision.
Each member of your team needs to be well versed in the selling points and unique product knowledge of your inventory. Especially with a new or featured product, staff should be ready to speak about and confidently answer any customer questions or risk losing a potential sale. 89% of consumers are more likely to make another purchase after a positive customer service experience.
Scheduling a regular staff meeting to coincide with the release of a new or seasonal product can help build confidence in your teams and validate your expectations of their performance.
Invest in employee training. As Nicasio notes, “Staff education isn’t something you can set and forget. Effective staff training programs require continuous effort and a combination of various educational methods.” Aside from verbal communication and step-by-step documents, Nicasio recommends throwing additional training methods into the mix. You can, for example, create videos demonstrating how to set up a display.
Christine Guillot, the founder at Merchant Method, recommends using “is and is not” photos to show employees how to execute your visual merchandising as well as how NOT to do it. Choose a content management system that will let you send all types of training materials easily to your stores and track interaction.
Include the following staff questions in your merchandising audit:
- Staff look professional and are easily identified.
- All staff received adequate product training.
- Can staff demonstrate basic to thorough product knowledge when asked?
- What was the last date of product training?
- Have staff received adequate customer service and selling skills?
- Staff have been assigned housekeeping responsibilities.
- They complete regular product restocks.
For more, see our Merchandising Checklist.
Execute the Merchandising Audit Program
Once you have created your merchandising audit checklist, the next step is to implement your audit program. Below are 9 steps concerning what should happen before, during, and after an in-store merchandising audit.
- Schedule the merchandising audit
Make sure they happen! If you use software, view your collaborative calendar to see to schedule audits, see where audits are in progress and where audits have yet to occur.

- Prepare for the merchandising audit
Familiarize yourself with the current ownership and management. Look up, compare and analyze past audits so you can put the latest information into perspective. Look for trends, repeat unacceptables and location to district averages. If you have any notes or questions, compile them ahead of time. Retail audit software can help by allowing you to run reports to see location trends as well as have a store’s entire audit history ready for review.
- Conduct the merchandising audit
As noted above, most in-store merchandising audits are conducted from the outside-in. Whenever possible, audit sections should be laid out to match the natural path of an auditor’s visit.
Start with the exterior (parking lot if applicable) the main windows and or facade of the building then work your way in, around the aisles and into the back of the store. Perform a perimeter walk to check that products and promotions are displayed correctly, then assess the stock levels of the sales floor, key walls, displays, and POS. Complete your audit and share the results.
- Include photos and documents.
As noted above, visuals are powerful. 65% of people are visual learners. FastCompany says one of the best ways to drive the message home is through visual content. Taking pictures and adding them to an audit is both quick and easy.
Photos help the auditor illustrate what exceptional performance looks like and gives a clear example of any issues or concerns. Additionally, include any supporting documents as attachments directly to the audit to keep all information in one place and easy to review.
- Assign and fix issues
Real-time reporting on issues that can compromise a promotional campaign is paramount. Additionally, an audit has more value if non-compliant issues are addressed and remedied. Again, software should help you with this. What has been assigned, to whom? What hasn’t been fixed? What’s late? Turn the audit into a vehicle for improvement and remedy issues before they jeopardize the success of the merchandising program.

An action plan is an opportunity to apply corrective actions to problem areas. It fosters ownership and accountability at store level by designating an individual responsible for rectifying each problem (anything deemed substandard or non-compliant by the district manager during the audit) and a target date for resolution. For more strategies, read about the action plan.
- Get staff on-board
No store likes being “audited”…until you give the store something back! Help employees track and manage their strengths and weaknesses. Employees like to be informed and audits help make goals clear. Use the merchandising “audit” as an instrument for continuous training (include best practice photos and descriptions), not as a tool for finger-pointing. Let staff comment on the audit and outstanding issues.
A store merchandising audit is an opportunity to grow sales and, if you put the right process and software in place, you will experience a “bottom up”, grass-root endorsement for your standards and significantly higher compliance.
Using software that allows for store sign off or acknowledgment allows the store to accept accountability for the audit. It also gives stores the opportunity to respond, ensuring communication flows from the bottom up as well as the top down.
- Share results
According to a recent Gallup Poll, employee engagement averages less than 33%. Good communication is one of the most important factors for fostering engaged employees. Sharing results promotes open communication.
Sharing result also gets everyone on the same page and can help stimulate conversations around goal setting and improvement. If you choose a software platform for your merchandising audits, veer away from platforms that charge by the user; you don’t want there to be a cost avoidance to getting all of your employees on board.
Employees that can’t access results miss this essential information and are less empowered to problem solve on their own. This thwarts communication and works against compliance and proper execution.
- Remember to follow-up on assigned issues
Following up on an audit can be time-consuming and potentially involve many back and forth emails or phone calls. Nine percent of auditors spend more than 10 hours per week following up on store visits! Retail audit software makes this considerably easier, faster and more effective by automating the communication and tracking outstanding action plan responsibilities.
- Plan the next merchandising audit
Repeat the cycle to encourage solid merchandising execution and compliance.
Seasonal Merchandising
Merchandising has moved well-beyond the four traditional seasons. The Wall Street Journal lists 13-20 seasons, noting retailers keep inventing more! Seasonal merchandising is all about evoking emotional and generating excitement. Customers are known to spend more during special seasons. Seasonal merchandising is also a way to turn seemingly everyday product into impulse buys.
For instance, Sam’s Club promotes “Health and Wellness” season in January with vitamins and exercise equipment. Big box stores celebrate back to school/back to college by thinking beyond school supplies and highlighting bedding, small appliances, and colorful kitchen ware perfect for new graduates with their first place.
Think about your customer base or the consumers attention you want to capture. Which seasons and holidays will resonate with them? For instance, Penguin Random House celebrated International Women’s Day with a pop-up bookshop in London. The “Like a Woman Bookshop” captured the attention of politically and socially conscious Millennial and Gen Z consumers.
Need some seasonal merchandising inspiration?
Merchandising for Social Shares
Shoppers are used to documenting their activities and that includes their retail experiences. It is worth the investment so that your store looks as good in photos as it does in person. 200+ million Instagrammers visit at least one business profile daily, and 70% of consumers say they discover new products via Instagram.
Play with depth and height. Think about unconventional ways to display products. The more relevant the better, so as you design you displays think about some of those unconventional seasons and holidays mentioned above. This is a great way to delight your customers and encourage sharing.
Last, experiential retail is a major trend and can be combined with displays that encourage social sharing. L’Occitane en Provence, for instance, launched a flagship store that features “a social media area of inviting yellow bikes in front of a Provence backdrop for Instagrammable pics that are featured automatically on a live video feed.”
For more, see “6 Ways to Use Visual Merchandising to Drive Social Shares.”
Common Merchandising Mistakes
In the above section, we outlined focus areas to maximize merchandising compliance. Below, we highlight the top 10 most common merchandising mistakes that can hamper your store’s engagement and conversion, and what you can do about them.
Poor housekeeping
Research by Applied Cognitive Psychology asserts that though we are unaware of it, what we touch while shopping affects what we buy. All your products and displays should always be clean and accessible. No one wants to reach for an item and come away with dusty fingers!

If applicable, hygienic testers or samples should be provided with a waste bin close by. Broken displays, burnt out lights, fraying carpet or faded signage are all turn-offs. Finally, be sure to train and delegate daily housekeeping tasks to all of your employees to keep your exterior and sales floor looking their best.
Bad lighting
Poor lighting makes your store appear drab and product lifeless. Worse, it can discourage shoppers from even entering your store because it can look unsafe or dirty.
Budget for adequate lighting throughout the store including windows, entrances and exits, displays, sales or restaurant floor, fitting room or bathrooms, and even employee-only areas. Paying attention to little things like lighting in their break rooms, backrooms and office areas lets employees know you care and want to provide an inviting work environment.

Traffic flow issues
Customers need to be able to move through your store, browse displays and access items easily. If a customer wanted to reach an item on a lower shelf but was blocked by shipping boxes, you are likely to lose the sale.
Do a walkthrough of your store following the path you observe most customers take. Are you using the right layout to ensure customers walk past feature and high impulse buy products? Can caregivers with strollers or customers with mobility assists smoothly navigate your store?
If you observe that customers often do not get to a display containing high margin items, shake up your store by moving inventory onto different walls or sections.
Distracting signage
A sign should never be so large or aggressive that it steals attention away from the product! As note above, research by the Brigham Young University found that displays with supporting signage outperformed displays without by 20%, so don’t discount signs all together either. Simply ensure your displays are not too busy, distracting or tacky.
“A good best practice is to use signs that are concise, bold and all in the same heading font.” Francesca Nicasio, Retail Expert
Unless you have a flair for art and calligraphy, avoid hand-written signage, as they make you look unprofessional. A small investment in professional signage can go a long way towards presenting a cohesive, welcoming in-store environment.
Similarly, damaged signage that’s torn, marked or worn makes you look unprofessional and should be taken out of the rotation. Ensure you have a budget for marketing set aside so you can furnish your displays with replacements whenever needed.
Confusing displays
Displays should tell a story with the use of simple marketing, a few props, and your product. 62% of shoppers impulsively purchase items when they are see an appealing display. If the customer can’t understand the item itself, your brand or the service being offered – it is not effective.
Rework confusing displays so the customer can easily read signage and absorb the display’s purpose without difficulty.
Cluttered displays
A chaotic shelf or display overwhelms the customer and can cause them to simply walk away. Less can truly be more! Focus on highlighting a single item or a few related items together to communicate a specific theme or story.
In addition, how much space you allot a product can subliminally communicate its value. Case in point: luxury products are often placed on a single display table or in a case of their own, which lends them an elevated air. In contrast, bargain items are often dumped into bins which customers must invest time sorting through.
Allot enough space and lighting for each of your products to help it succeed. For high margin items, ensure they are positioned front and center of the store or at eye-level on shelves with a generous amount of space between items.

Hidden products
If a customer enters your store and cannot find what they are looking for chances are you’ve lost a sale. With the increasing adoption of online shopping – where a customer can search for exactly what they want and have it delivered promptly – retailers must ensure the in-store shopping experience is quick and painless!
A customer should not have to guess where products are located. Always ensure your products are organized by the category, like color, size or style that is the most obvious. Feature groupings should be natural, and any cross-promotional items should have an obvious relationship.
Neglected/uninspired displays
Not changing a display often enough or using the same old merchandising tactics will give customers little to no incentive to pop into your store. After a specific sale or season replace signage right away. Use platforms like Instagram, Pinterest or our article How to Use Visual Merchandising to Drive Social Shares to get inspiration. Don’t be afraid to be unconventional!
“Rely on modular pieces such as suspended displays to fully utilize the space — drawing the eye from top to bottom — or variable height display stands to create more visual interest.” – Amit Adler, Vice President of Sales at UDIZINE
Finally, keep track of the levels of customer engagement each new display attracts. This can help point you in the right direction to repeatedly capturing attention.
Poor customer service

When employees are rude, sarcastic or not knowledgeable, no matter how great your store looks, your sales will be negatively impacted. After two bad experiences, 42% of customers will stop shopping with a brand. Observe during your audit and conduct regular touch points with your team to ensure service standards are being met.
Each customer should be greeted upon entry to your store. Employees should be out on the sales floor open to customer interaction and not hiding behind the checkout. When good customer service is provided, 81% of customers are more likely to purchase in-store. Conducting sales, collecting customer information, and your returns processes should be streamlined and simple for the customer.
Neglected checkout area
When a customer is ready to make a purchase, they have already taken the first step: Making the decision to purchase from you! Ensure your checkout area is maximized to entice the customer to additional purchases.
Use the wall behind the checkout to double represent high margin, new or bestselling products. As noted above, the checkout is also a great opportunity to up sell add-on or low-price impulse items so make sure to have an area for a small selection of these. You do not want to provide too many choices however and overwhelm the customer.
Finally, whether you are a large retailer or a small to medium business, don’t let a customer who is checking out get a bad impression from a messy cash wrap. Ensure staff do not leave food, drinks or personal items in view, and any non-applicable paperwork is out of sight.
What to do About Unsuccessful Merchandising Campaigns
Companies typically spend 13.6% of their total budget on marketing and promotional campaigns. So it’s not surprising that when a campaign flops, there is a fair bit of frustration. Responding to a failed campaign with a “post mortem” is a great way to keep from repeating the same mistakes.
“The biggest mistake you can make is not learning from your failures. If you don’t, you’re doomed to repeat them. To some degree, every campaign is a grand experiment and the deeper goal, whether successful or not, should be to gain insights and improve your marketing for your next campaign.” – David Hoos, Marketing Manager
The goal isn’t to blame, but to pinpoint errors and gain insight. To do this, ask questions about the campaign like:
- Which aspects worked well?
- What didn’t work well?
- What was the objective of this campaign?
- Was the campaign executed on time?
- Was the campaign executed fully?
- Was seasonal product featured in campaigns in stock in abundance?
- What difficulties did you encounter with planning or executing the program?
- What are the things we can do better next time?
- What feedback did you receive from customers?
- What things did not go according to plan?
After you have collected all your data, summarize and take a look at key issues and communicate them to any invested leadership so you can take what you learned into the next campaign.
Merchandising: Sample Checklists

Want to start auditing your stores for merchandising compliance today? Use one of our sample checklists below and set the bar for performance. Also, consider adopting Bindy; 92% of our customers report improved execution of merchandising programs.
The software or service you use should be able to tell you exactly who has and hasn’t done audits and where, provide detailed reports, timestamps and photos to ensure merchandising is executed correctly, on time and in full across all of your retail stores
The name of the game is cost reduction for retailers. I can’t think of a better way to lower the cost of running a retail business than investing in quality retail software which does so much of the tedious work in a breeze.
Hi Bindy team,
I really enjoyed your article “Retail Merchandising – The Definitive Guide.” The clarity and depth you bring to such an essential topic are impressive and useful for retail professionals.
Thanks for your time!
Best regards,